
It’s amazing how much of our information we store on our devices. Whether it’s emails, text messages, photos & videos, or documents, our devices, and their corresponding cloud services, have become our digital file cabinets. Unfortunately, we have limited amounts of storage available and can quickly fill it up before we know it. Before buying a new device or more cloud storage, use these tips to make more space.
Which Storage?
Apps can make use of storage on your device as well as in the cloud. Looking at what an app stores in both will give you information to help you determine the best way to free up storage space.
Device Storage
To see how the storage on your device is being used, go to Settings, then tap General, followed by iPhone Storage (on an iPad, this will say iPad Storage).


It may take a few moments for the Storage screen to populate with information. The first section of this screen shows the storage available on your device and a graph that shows what categories of data are using that storage:

In the above graph from my iPhone, you’ll see that Apps are taking quite a bit of storage, followed by System and Media, and then other smaller categories.
Recommendations
The Recommendations section shows settings and actions you can take to free up storage on your device. The list you’ll see here depends on the types of data on your device and the amount of storage they are using.

Offload Apps
You will see a recommendation called Offload Unused Apps which shows how much storage you can save if you enable it. Offloading an app is similar to deleting an app with one important difference: offloading the app removes the app but keeps the app’s data on your device. This is useful if you have apps that you only use occasionally and that take up a large amount of storage. You can offload the app, and then reinstall it later when you want to use it again, while keeping its data on your device.
My opinion on this recommendation is: do not enable it. While I like the ability to offload rarely used apps, having the system decide when to do this, instead of you deciding, means you may find an app that you want to use is no longer on your device. Instead, as I show below, you can decide yourself which apps to offload and when to do it.
Review Large Attachments
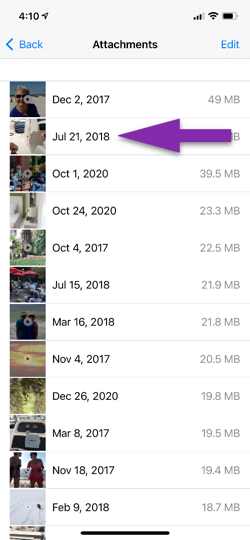
This recommendation shows you large attachments from the Messages app. Tap on the recommendation to see the list of attachments:

From the list, you can tap on an individual attachment to open it so you can more clearly see it. When finished reviewing the item, tap Done in the upper left corner of the screen.
To delete an attachment, swipe left on the item in the list and tap the delete button:

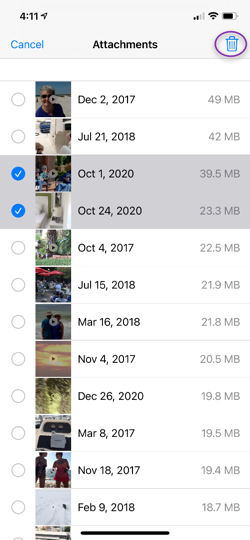
To delete several attachments at once, tap Edit in the upper right, then tap each attachment to select it, and then tap Delete (the trash can icon) in the upper right:

Other Recommendations
Depending on the apps you use and the data they contain, you may see other recommendations in the list. Each of these works similarly to what I’ve described above. Tap on the recommendation to see the items you can delete to free up space.
App List
The rest of the Storage screen contains a list of the apps on your device. Each item in the list shows how much storage is being used and the last date you used the app (if there is no date listed, that means you’ve never used the app on this device).
Tap on an app to see options to free up space for that app. The options you see will vary depending on the app.

At the top you will see the app’s name, how much storage the app is using, and how much storage the app’s Documents and Data is using.
Next you have the option to Offload the app. As I discussed above, this removes the app but leaves its documents and data. You can see here how much space both are using, and determine if offloading is a good choice.
The option to Delete the app follows. This will remove both the app and all of its Documents and Data. As I noted in the last post, be sure you don’t want to keep any of the Documents and Data before choosing this option.
After these choices, depending on the app, you may see other options that allow you to delete specific items from the app. For example, the Music app shows artists, albums, and songs that have been downloaded to your device.
For each of these items, delete them in the same manner I describe above: either by swiping left on an individual item and choosing Delete, or by tapping Edit, selecting several items, and then tapping Delete. Note: tapping Edit for some apps will provide a delete button for each item instead of allowing you to select several items.
Space For Photos
Photos and videos take up a considerable amount of storage space. If you’re using iCloud Photos, you can have your device automatically use a smaller version of these when space is running low, while keeping the full-sized version in iCloud. Your device will download the full-sized version when needed (for example, when you tap on it to view it). This option can save quite a bit of space.
To check if this setting is enabled, go to Settings, then tap Photos:


If iCloud Photos is not enabled, you’ll need to do so before using this feature. Note: you will need to have storage available in iCloud to store your photos there. See below for more information about iCloud storage.
Make sure Optimize iPhone Storage is checked. If not, tap it to enable it. If your device is not low on storage you won’t see any change. But if it is, after some time, you’ll see more storage available as your device optimizes the photos and videos.
Cloud Storage
Just as with the storage on your device, the space you have available in Apple’s iCloud service is also limited. Apple will gladly let you pay for more iCloud storage, but before doing that, it’s worth checking to see what’s using the iCloud storage to determine if you can make some room without having to pay for more.
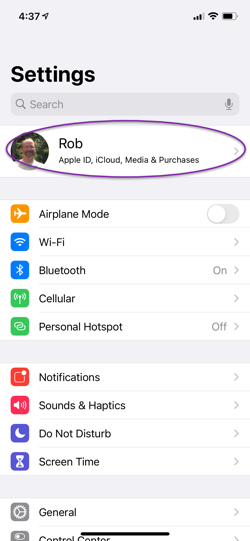
Go to Settings, scroll to the top of the list and tap your name. Then tap iCloud in the list.

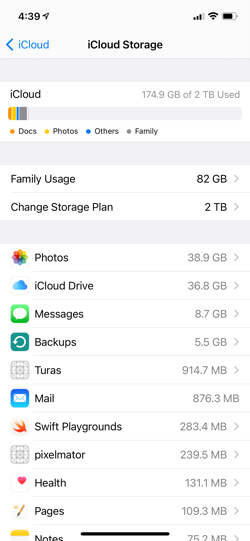
At the top of this screen you’ll see how much iCloud storage you have available and a graph, similar to what you saw on the Device Storage screen:

Now, tap Manage Storage. It may take a moment to show the next screen:
Here you can change your storage plan and, if you’re sharing storage with your family, you’ll see how much space they are using.
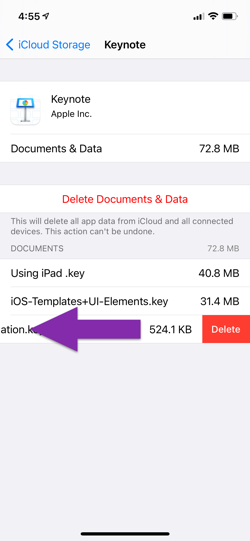
Next you will see a list of apps, each showing how much iCloud storage it is using. Tap on an app to see what is using the space and options to delete the data:

Tap Delete Documents and Data to delete all the data for this app that is stored in iCloud.
Some apps will show individual items as well. To delete these, swipe left on the item, then tap Delete.
As always, be sure you no longer need the data before you delete it! Also note that when you delete data from iCloud, it will no longer be available on any of your other devices.
Backups
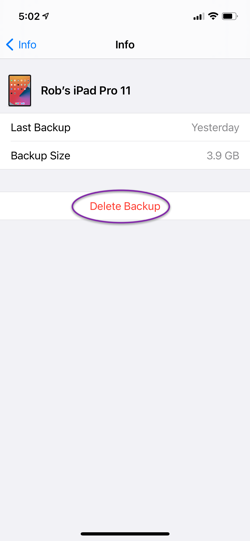
If you’ve ever upgraded to a new device, you may have old backups stored in iCloud that you no longer need (you are backing up your devices, right?). These can take up considerable space. Tap Backups in the app list to see all the backups stored in iCloud.


The backup for the device you’re currently using will show This iPhone or This iPad so you’ll know which is the backup to keep.
To remove an old backup, tap on the backup and then choose Delete Backup:
Other Cloud Services
If you use another cloud storage provider, such as DropBox, Microsoft’s OneDrive, or Google’s Drive, use the provider’s app and follow a similar approach: review what you’re storing in the service, and delete items you no longer need.
Space For More
I hope this post helps you continue working towards a fresh start for the new year. Using these tips can give you extra space for more photos, documents, or other items and may mean that you don’t need to buy a new device with more storage or pay for more iCloud storage.
If you don’t want to miss new posts, sign up to be notified below or follow me on Twitter.
Cover photo by Lucas van Oort on Unsplash


Awesomely great information, I could not believe how much we freed up on our iPhones. Keep the tips coming 🙂
LikeLiked by 1 person
That’s great to hear! I’m glad it helped.
LikeLike