
We use our iPhones and iPads to take photos, write documents, take notes, and much more. Often we’re with other people while we’re creating things, whether it’s taking photos during a trip, planning a vacation together, or working on a presentation. While there are many great ways to share things with other people, if everyone is using Apple devices and are near each other, there’s a better way. It’s called AirDrop.
Ways to Share
There are many ways to share things from your iPhone or iPad with other people. For example, you can send a photo in a text message, or you can attach a document to an email. These work well and are great ways to send things to others.
But, if the person you want to share with is nearby and is also using an Apple device, then AirDrop offers some advantages:
- Direct: AirDrop puts the item that is sent into the same app it was sent from. Photos go into the Photo app, web pages open in Safari, etc. No more finding and copying photos from Messages into the Photos app.
- Fast: AirDrop connects directly to the other device and is very fast. It’s often much faster than sending a message or an email.
- Secure: AirDrop uses an encrypted connection and ensures the recipient is verified. And, since AirDrop is a direct connection, there is no other service, such as an email server, involved in sending items.
- Offline: AirDrop does not require the internet or a cellular connection to work. So, if you’re camping or out to sea, you can still share things. (Wi-Fi and Bluetooth do need to be turned on, so that the two devices can talk directly to each other).
To Start
To use AirDrop, both devices need to have Wi-Fi and Bluetooth turned on, though you do not need to be connected to a Wi-Fi network or the Internet. Go to Settings and check the following:


Next, you need to ensure that AirDrop is enabled. Go to Settings, then tap on General and then tap AirDrop:


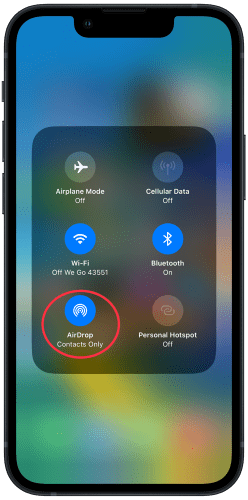
The default setting for AirDrop is Contacts Only. This means that only people in your contacts list will be able to AirDrop to you. This is the best setting for most situations.
If you are with others that are not in your contacts list, and you’d like to allow them to AirDrop something to you, then choose Everyone for 10 Minutes. This allows anyone nearby to attempt to AirDrop to you. You’ll need to accept anything that is sent, so it’s still safe. After 10 minutes, the setting will automatically go back to Contacts Only.
If you would rather not use AirDrop at all, you can select Receiving Off. While you’ll still be able to send things using AirDrop to others, no one will be able to AirDrop to you.
Quick Access
Use Control Center for a quicker way to change your AirDrop settings. (More on Control Center in a future post)
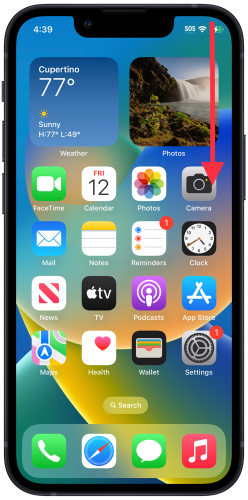
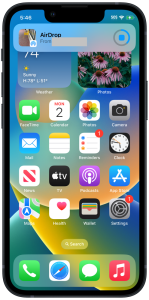
On an iPhone or iPad without a home button, swipe down from the upper-right corner of the screen:
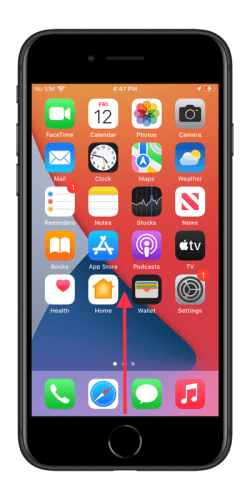
On an iPhone or iPad that has a home button, swipe up from the bottom:
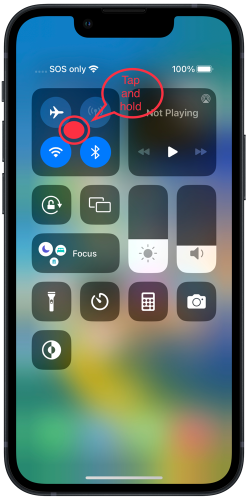
This brings up the Control Center.
From here, tap and hold on the area with the Wi-Fi and Bluetooth icons:
Then tap on AirDrop and choose the setting you want:

Share using AirDrop
To AirDrop to someone, they must be nearby and the screen on their device must be on.
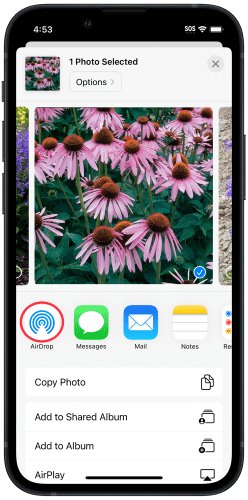
AirDrop an item by using the Share Sheet. For example, to AirDrop a photo, go to the Photos app and tap on a photo to share, then tap the Share button:

Next, tap AirDrop and you’ll see a list of people nearby that you’re able to send to:
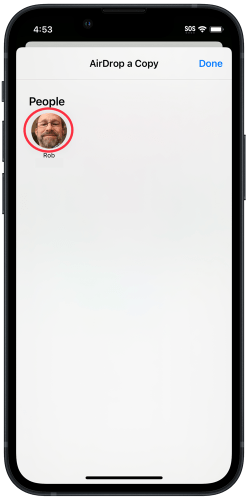
Tap on the person you’d like to send to. Wait until they accept the AirDrop before leaving this screen.
If you don’t see anyone listed and they are nearby, make sure their device has the settings noted above in To Start and that the screen is on.
Note: People that are nearby that you regularly AirDrop to will show up in the top row on the Share Sheet with the AirDrop icon on their picture. This makes it easier to AirDrop. Just tap on their picture with the AirDrop icon.

Receive an AirDrop
To receive an AirDrop, the screen on your device must be on, and the sender must be in your contacts list (unless you’ve turned on Everyone for 10 Minutes as noted above).
When someone sends you an AirDrop, your device will display a message asking if you’d like to accept or decline:

Tap Accept to allow the item to be sent to your device. Most often, it will be saved in the same app that it was sent from. After receiving the item, the app will open and show you the item you just accepted. If you would rather not accept the AirDrop, then tap Decline.
If there isn’t a single, standard app for the item being sent, you’ll be asked to choose which app to save to. For example, if someone is sending some text, there might be several apps that could be used. After you tap Accept, tap the app you’d like to use from the list:

AirDrop to Yourself
If you have more than one Apple device and want to send an item from one to another, you can also use AirDrop. Both devices must be signed in with the same Apple ID.
Again, the receiving device’s screen must be on. Follow the same steps as above, but instead of selecting a person, select your other device from the Devices list.

Since you’re sending to yourself, you won’t be prompted to accept or decline the AirDrop. The item will just be saved in the same app it is sent from. If there is more than one app that could accept the item, you’ll first be shown a list as noted above.
Mac
AirDrop also works on the Mac. It’s very similar to what I’ve covered above. To send an item, right click on it, click Share, and then select AirDrop. To receive, the Mac’s screen must be on. You’ll get a message to accept or decline.
iOS 17: Even Easier
The recently-released iOS 17 has some interesting new AirDrop features, and I’ll cover two here. I’ll have more to say about iOS 17 updates to AirDrop, as well as other new features, in future posts.
Both of the features below require iOS 17 (see here for more info about iOS 17) and make AirDrop even easier by initiating the transfer when you hold the top of one iPhone near the top of another, head-to-head if you will. The tops of the phones must be quite near each other, otherwise, these features won’t work.
Sharing
With iOS 17 you can share something simply by holding your phone near another person’s phone (as mentioned above, top-to-top). To do this, open the item you want to share, for example, a photo. Now bring the top of your phone near the top of the other person’s phone. Both phones will make a sound and show a nifty animation on the screen.
On the phone that is initiating the AirDrop, you’ll see this:

The top of the screen shows who you’re sharing with. Tap the Share button at the bottom to send the item. To cancel and not share, just swipe up from the bottom of the screen.
The person you’re sharing to will see this:
Since they held their phone close to yours, indicating they want to share, they don’t need to accept the AirDrop. It will automatically be accepted into the default app, the same as outlined above. To cancel before the transfer begins, tap the stop button (the square inside a circle).
NameDrop
NameDrop is a new feature that makes it simple to swap contact information. To do that, make sure both phones are at the Home Screen (not inside an app), and bring the tops of the phones close together, the same as above. Each person will see something like this:

You will see either your phone number or your email address listed. This is what will be sent to the other person. Tap on it to change what you’re sending.
Next, tap Share to send your information to the other person, or tap Receive Only if you only want to receive the other person’s information but not send your own. You can swipe up from the bottom of the screen to cancel the AirDrop altogether.
Note: if you already have the other person in your contact list, they won’t be prompted to send their information to you, and vice versa.
Sharing Made Simple
AirDrop works with most apps with a Share button. I think one of the best things about AirDrop is that you don’t have to take extra steps to get the shared item into the right app. For example, you don’t have to save a photo sent in Messages to the Photos app. It gets put in the right place from the start.
I hope this post helps you more easily share things with those around you. If you have any questions, let me know in the comments below.
Cover photo by Priscilla Du Preez on Unsplash


Nice post, Rob. AirDrop is a super nice feature, one of those Apple things that works.
I like your point that it’s direct, meaning the item goes straight into its associated app and doesn’t get dumped in the Files app’s catch-all “Downloads” folder. I also don’t think I realized it was fully encrypted – nice point.
Your list of text-based apps to share text too – wow! – that’s a lot of texting apps. You’ve got it covered, nice. 🙂
So I tried the new AirDrop iOS17 feature with my wife’s phone – cool! I like the animation and how simple it is. There’s also a little haptic feedback. Again, it’s one of those Apple-polish features.
Oh, your example about camping is good b/c it’s something I’d actually do. And I almost never consider AirDropping to myself, but if I’m out camping and take photos on my phone, I’d want to see them on my iPad’s big display right away, and without wifi or iCloud to sync, I can just AirDrop them all. Yeah!
I haven’t tried NameDrop yet…I’ll keep that in mind.
Thanks for sharing. Nicely organized and explained, as always.
LikeLiked by 1 person
Thanks, Jason. Im glad you enjoyed the post.
Yeah, I might have a few too many apps that handle text. I should probably do some thinning! 😀
I haven’t used NameDrop yet either (other than writing this post). I think it will be nice, just haven’t had the need yet.
Thanks, as always, for reading and your great comments.
LikeLiked by 1 person