I’ve written previously about how using strong, unique passwords and also ensuring that your devices are always up-to-date are important ways to stay secure online. In this article, I’m going to cover how to ensure that you are the only one that can sign in to your account. It’s called two-factor authentication, which is quite a mouthful, but is simple to set up, simple to use, and is a big improvement over just using a password.
What Is It?
While the term two-factor authentication sounds very techie and complicated, it’s really a pretty simple concept. It means using two different ways, or factors, to verify your identify instead of only one.
Using a password is the most common single factor to prove your identify when signing in to an account. But, if someone steals or guesses your password, then they can, in essence, prove that they are you, and gain access to the account.
Two-factor Authentication requires a second way to prove your identity. The most common way this works is that after you enter your password, a code is sent to your phone that you must then also enter. So, not only have you proven your identity with your password, but since you also are able to enter a code that you received on your phone, you’ve doubly proved it. If someone does steal your password, they won’t be able to sign in because they won’t also have the code needed.
Where Is It Used?
In this article, I’m going to cover turning on two-factor authentication for your Apple account. Many companies, such as banks and other financial institutions have also started to implement two-factor authentication on their accounts to better protect their customers. If you have a chance to turn this feature on for other accounts, I strongly encourage you to do so. Each company will have its own method for setting up and then using it, so you’ll need to follow their instructions.
Setting Up
You only need to set up two-factor authentication once, using one of your devices (iPhone, iPad, or Mac), since it is tied to your Apple account and not your device.
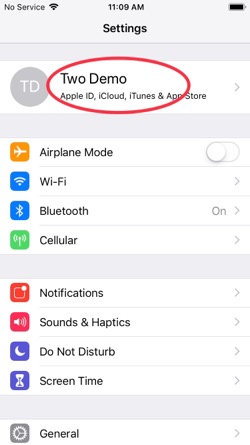
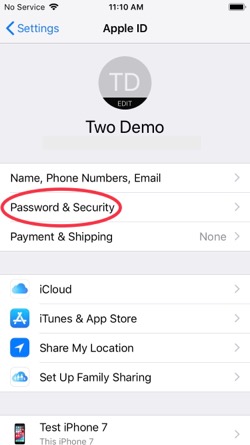
Go to Settings, tap your name at the top of the list, then tap Password & Security. You may have to enter your Apple ID password before continuing.

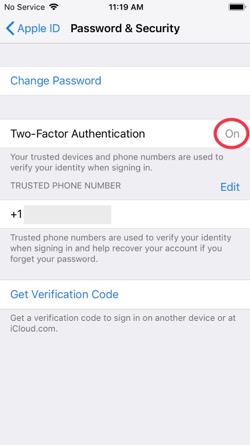
If Two-Factor Authentication is already turned on for your account, then skip down to the Trusted Phone Number section below.
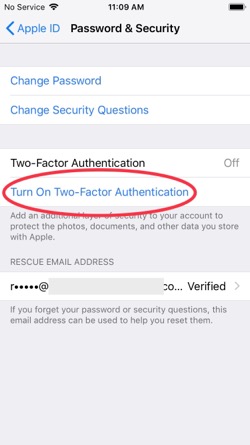
If it is turned off, tap Turn On Two-Factor Authentication and you’ll see the Apple ID Security page. Tap Continue.

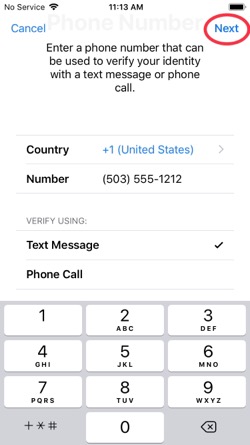
Next, you’ll be asked to enter a phone number. Use your own phone number here, as this will be the main number used to verify your identity. You might also be asked to answer the security questions you originally set up on your account.
Once you enter your phone number, tap Next at the top of the screen:
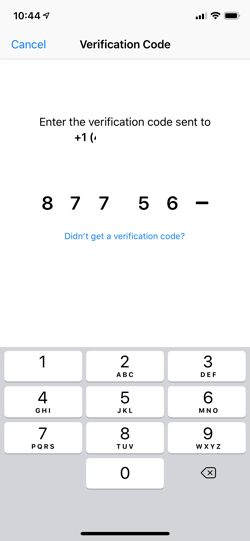
You will receive a text message on your phone with a verification code. Go to the Messages app to find the code, then come back to Settings to enter it:

Once you do that, your device will ask you to enter its passcode, so go ahead and enter it:

You’ve now set up two-factor authentication and have substantially increased the security of your Apple account. Any iPhones, iPads, or Macs that are already signed in with your Apple ID are now your trusted devices and will receive verification codes (more on this below) when needed.
Trusted Phone Numbers
Now that you have two-factor authentication enabled, there is another step I strongly recommend: adding another trusted phone number to your account. Here’s why: if you ever lose your phone or it becomes inoperable, you won’t have a way to receive the verification code you’ll need to sign in to your account.
Note: if you also have an iPad or a Mac, those devices will receive verification codes as well, so you don’t strictly need to add another phone number, but it is still a good idea.
I suggest adding the phone number of someone that’s usually near or easily reachable, such as a family member or close friend.
To do this, go to the main list in Settings, and tap on your name at the top of the list, and then tap Password & Security:


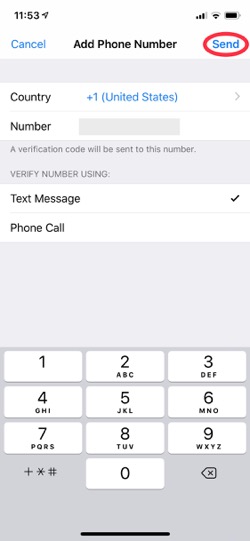
Now, tap Edit in the Trusted Phone Number section, and then tap Add a Trusted Phone Number:


If asked for your device passcode, enter it and then enter the additional phone number and tap Send at the top of the page:

The phone number you just entered will receive a text message with a code, which you will need to enter:
Now you’ve got a back-up trusted phone number when you need it.
Using Two-Factor Authentication
Now that you have two-factor authentication enabled for your account, when you sign in to an Apple web site or a new Apple device, you will enter your password as always, but your trusted devices will be sent a verification code, which you will need to enter as well.
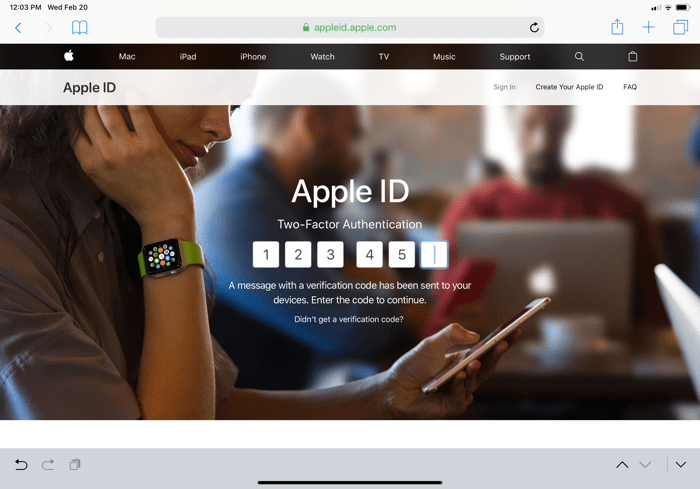
For example, when you log in at Apple’s account management web site, you’ll enter your password as usual…
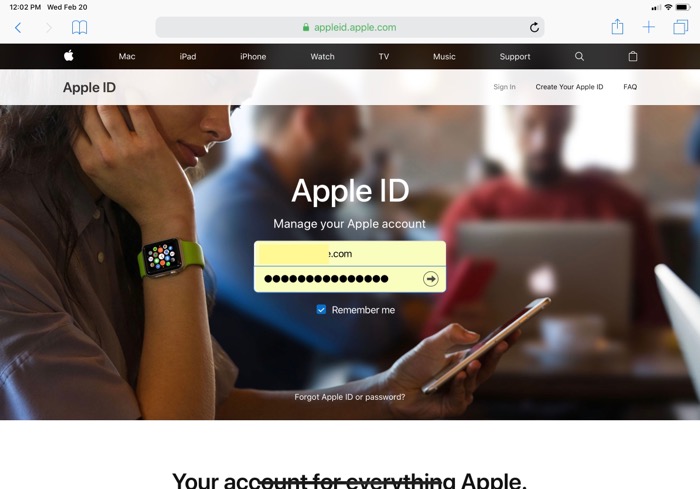
…but then you’ll also be asked to enter a verification code:

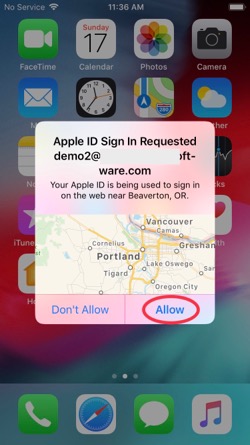
On your trusted device, you’ll see an alert telling you someone is trying to sign in and their approximate location. If your device is locked, you’ll see a notification on the lock screen:

Tap that notification and unlock your device, then you’ll see the alert. Tap Allow and you’ll be shown the verification code:

Enter the verification code where you are attempting to sign in, which in this case, is the Apple web site, and you will finish signing in.
Stay Alert
If you receive the Apple ID Sign In Requested alert shown above when you’re not signing in, then tap Don’t Allow. This will stop the sign in attempt and keep your account safe. You should still change your password right away since someone else must have your password. To do that, go to Settings, tap on your name at the top of the list, then tap Password & Security, then tap Change Password and follow the instructions.


More Secure!
Your Apple account is now much more secure, which means all the information you store with Apple (photos, emails, files, notes, etc.) is also more secure. While you may see this added sign-in step as a nuisance when it’s required, it’s definitely worth it to ensure that only you can access your account and information.
LINKS
For instructions using a Mac, see Apple’s Two-Factor Authentication Article.


Good additional protection Rob, thanks! Something to pass on regarding using Apple passwords and security. When you set up new passwords, remember to check any online banking that uses passwords to access merchants when getting and paying bills. I’m wondering if it isn’t easier to just use the merchants website and link it to your bank for payment, rather than set it up to pay merchants online from the bank perspective. Any security thoughts on these two approaches?
LikeLike
Good point about changing passwords and online payments that use those accounts, Tom. People should definitely check that when changing passwords. And, good question about using your bank to make payments vs using a merchant’s site to draw from your bank account.
While online payments using both approaches is far more secure than sending a check, I prefer to use the bank for online payments as I think that’s the more secure approach. To compare the two:
Using a merchant’s site to draw from a bank account
This method requires you to provide your bank’s routing number and account number to each merchant. Each merchant then stores this information themselves so they can connect to your bank and draw the payment when needed.
The merchant decides when and how much to draw from your account. Normally this works fine, but errors do occur. For example, when we lived in a condo, we had our HOA dues drawn from our account. One month, the management company made an error and overdrew everyone’s account. It took them days to fix the error and many people were worried that outstanding checks would bounce because of this.
Also, while merchants should store your bank information in a secure way, we often read about companies failing to properly secure information on their networks. If the merchant’s network is breached, and they haven’t properly secured your bank information, then the thieves will have it.
Your liability for any fraud in this case may be at least $50, but could be $500 or more. Some banks will cover this completely, but the federal rules don’t require it.
Using a bank to pay a merchant
When using your bank’s online payment system to pay a merchant, you provide the merchant name and the number for your account with the merchant. The bank sends the payment along with the merchant’s account number, but not your bank account information.
Also, using the bank’s system, you are the one to determine when a payment is made and how much will be paid. You have more control over the transaction.
To me, this approach is more secure because your bank information never leaves the bank and you control the payment. If the bank’s systems are ever breached, the merchant information they store is generally less useful to the thieves. If the merchant is a credit card company, you have zero liability for any fraud, and if it’s just a utility company or similar, then there’s little the thieves can do with it.
LikeLike