
It seems as if every website and app wants our email address. They often use our email address as our user ID, and also as a way to communicate with us. The problem is that many of these companies share and sell our email addresses, which leads to unwanted emails and spam. Luckily, there is an easy way to keep your email address private and still use these sites and apps.
The Solution
Apple’s Hide My Email feature creates separate, unique email addresses to use with specific websites, apps, and email recipients. Emails that are sent to these addresses are still delivered to your regular inbox, but your real email address remains hidden. These email addresses are saved across all your devices so you don’t have to remember them, and the best part is you can turn them off if they start to get unwanted emails.
Hide My Email is available if you subscribe to iCloud+, which is Apple’s premium version of iCloud. If you’re paying for more iCloud storage or have a subscription to Apple One, then you’ve already got iCloud+.
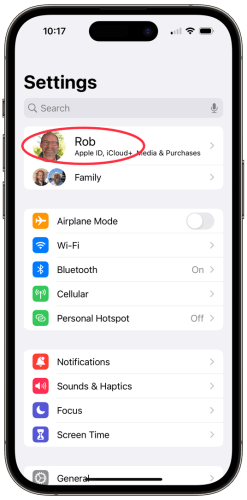
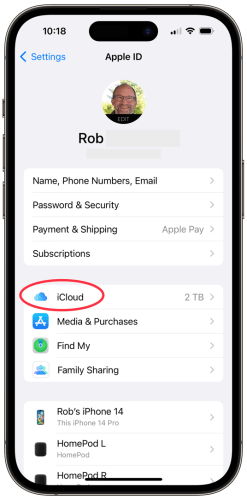
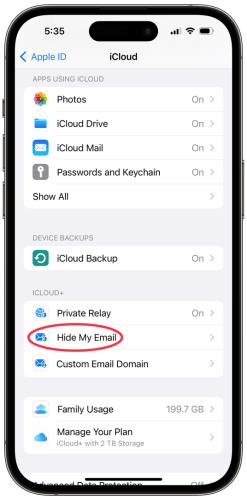
To see if you’re subscribed to iCloud+, go to Settings, tap your name at the top of the list, then tap iCloud:
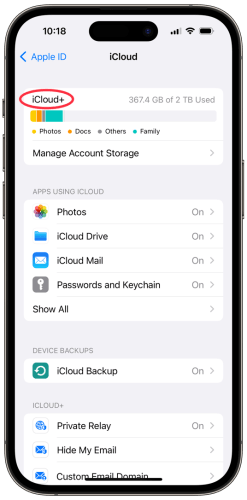
If you see iCloud+ at the top of the screen, then you’re already subscribed. Otherwise, you’ll see iCloud (without the “+”).
To read more about iCloud+, tap here. To read more about Apple One, tap here.
Subscribe
If you’d like to subscribe to iCloud+, tap Upgrade To iCloud+ from the iCloud screen and choose the storage plan that you’d like:

The rest of this article assumes you have iCloud+, but even if you don’t, and are interested in how this feature works, read on.
When To Hide
There are many situations where hiding your email address isn’t needed, such as emails you send to friends and family, and businesses you trust not to share your email address. But, given the proliferation of spam and companies selling your personal information, I think using Hide My Email makes sense in most situations.
Using Hide My Email
It’s easy to create a new Hide My Email address, though the steps are somewhat different depending on the app you’re using. Here are the steps to use for Safari and the Mail app.
Safari
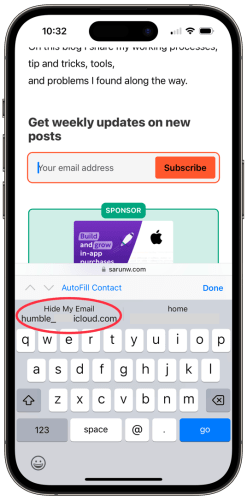
If you’re on a web page that requests your email address, tap into the email field. Then, tap Hide My Email above the keyboard:

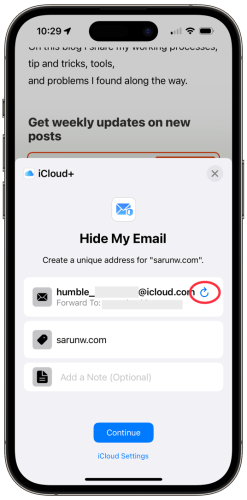
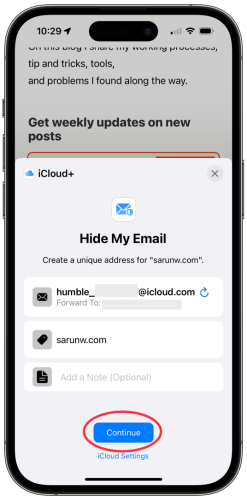
A window will pop up showing a new email address that will be used for this site:

The random email address is created using a combination of words and numbers, which can sometimes be a little strange. If you don’t like the email address that was created, tap the circular arrow to generate a new one:
You can add more information about the new email address by tapping Add A Note.
Tap Continue when you’re finished, and the new email address will be saved and inserted into the web page for you.
Using the Address
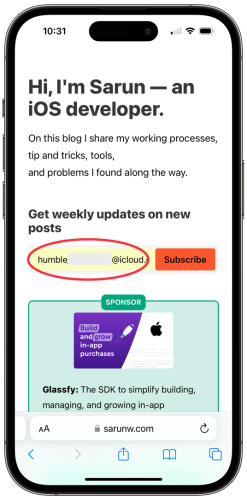
The next time you’re on a website where you’ve created a Hide My Email address, when you tap into the email address field, the keyboard will suggest your Hide My Email address, making it easy to log in with your new address:
Adding a Password
If you are creating a new account on a web page, and also want to create a password, I recommend using the built-in password manager to create a strong, secure password.
To create the password, tap into the password field on the web page, and then tap Use Strong Password:

Once you create the account, you’ll be asked if you’d like to save the username and password. This information will sync to your other devices.
To read more about managing passwords, read my article here.
Mail App
When you send an email to someone, the recipient will receive your email address. Often, this isn’t a problem, but sometimes companies will start sending marketing emails, or worse, sell your email address, which leads to even more unwanted emails.
The Mail app makes it easy to create a Hide My Email address so that the recipient does not receive your personal email address.
To start, launch the Mail app, tap on the New Email button, and fill in the To: field:

Next, tap From, which will expand, and then tap From again:


In the list that pops up, tap Hide My Email at the bottom. If you have a lot of email accounts, you may need to scroll to the bottom of the list:

The From address will now show a new email address that was generated specifically for this email recipient.

When you send this email, the recipient will see this email address instead of your personal email address.
If the recipient replies or sends a new email to this address, it will be delivered to your regular inbox. Your replies will also be sent from that address.
Sending Again
One thing to note: each time you send a new email, the Mail app will default to using your personal email address. Follow the steps above to choose your Hide My Email address again. The Mail app will use the addresses you’ve already created.
Apps
You can also use Hide My Email for apps that ask for an email address. Many apps make this very similar to Safari, so the steps are similar to what I’ve written above.
Some apps, however, make it a bit more difficult. For apps that don’t show Hide My Email above the keyboard, you can use the steps in Manage Addresses below to manually create a new email address and then copy and paste it into the app.
Receiving Email
Emails sent to one of your Hide My Email addresses will be delivered to your normal inbox, along with your other email. These emails will indicate that they were sent to a Hide My Email address:
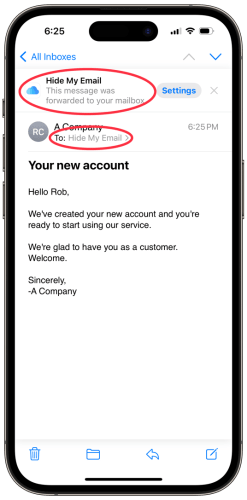
The Settings button takes you to the Hide My Email settings, which I discuss below.
Replying
When you reply to an email that was sent to one of your Hide My Email addresses, the reply is automatically sent using that same address. This way, you can carry on an email conversation without having to always set the Hide My Email address.
Managing Addresses
Your Hide My Email addresses are automatically saved and synced across all your devices that are signed in with the same iCloud account.
To manage your Hide My Email addresses, go to Settings, then tap your name at the top of the list, then tap iCloud:


On the iCloud page, tap Hide My Email:
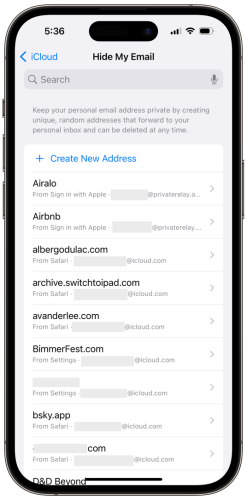
You will see all the Hide My Email addresses that you’ve created:
Creating A New Address
There may be times you want to create a new email address when you’re not on a web page or sending an email.
Tap + Create New Address at the top of the list:

You will be presented with a window showing the new email address:

If you’d prefer a different email address, tap Use Different Address to generate a new one.
Tap Label Your Address to add a website address, company name, or another label that will help you remember what this email address is used for.
You can also add a note to provide additional information if needed.
Once you’re ready, tap Next at the top right of the screen:

You will see the All Set page, indicating that the new email address has been created.
Hint: if you’d like to use this email address right away, tap and hold on the email address and select Copy:


Editing Information
To change the label or note associated with an existing email address, just tap the address in the list and make the changes. When finished with a change, tap Done at the top right of the screen.
Deactivating an Address
To stop receiving email for a specific Hide My Email address, you deactivate it. You might want to do this if you receive more emails than you want from the website or company, or worse, you start to receive spam sent to the address.
To start, go to Hide My Email settings as shown above under Manage Addresses. Then, tap on the address you want to deactivate.
Hint: you can use the search field at the top of the page to quickly find the address you want.

To deactivate the address, tap Deactivate Email Address at the bottom of the screen:

You will be warned that you’ll stop receiving email sent to this address. Tap Deactivate to continue, or tap Cancel if you would rather not deactivate the address.
Note: if you use the Mail app to send a new email from a deactivated Hide My Email address, it will automatically be re-activated.
Reactivating or Deleting An Address
If you’d like to start using a deactivated address again, or delete it completely, go to Hide My Email settings as shown above under Manage Addresses and scroll to the bottom of the list. Tap Inactive Addresses to see the list of email addresses that you have deactivated:


Tap on the address you’d like to change. To reactivate the address, tap Reactivate Address. If, instead, you’d like to permanently delete the address, tap Delete Address:

If you delete the address, it cannot be used again to receive email.
Stay in Control
I hope this article helps you better control your email address. It’s unfortunate that we have to worry about how our email address is used, but that’s the reality of the world today. While using Hide My Email won’t stop spam and tracking overnight, it will help it from getting worse. You might even consider going through your accounts and creating new Hide My Email addresses for some of them.
Let me know what you think in the comments below.
Cover photo by Stefan Steinbauer on Unsplash


Wow, Rob, great post. Well organized. I really didn’t know how robust the Hide my email feature was! I have iCloud+, but I’ve never bothered to learn more about this. This is a great reference for me beyond Apple’s support pages.
It’s good to know this is available. Though I don’t think I quite need it. To me, this is like a power-user feature that most normal people likely won’t use or be aware of without more marketing from Apple.
Akin to this, I do leave Private Relay turned on, though I’m sure there’s more to it that I may not be taking advantage of.
I think Apple should take the Passwords, Private Relay, and Hide my Email settings out of Settings.app and house them in a new stand-alone Privacy/Security Manager app.
Tangentially, I like Bitwarden the most as a stand-alone password manager, but I end up using Apple’s built-in one since it’s more convenient.
Thanks for writing up this post. It’s a lot of work with all those screenshots.
LikeLiked by 1 person
Thanks, Jason. I appreciate that.
I agree with you about the need for a separate app. Those privacy features are really useful but hard to find. I’ve created a shortcut on my home screen that jumps to the passwords in settings, which makes it somewhat easier, but it really does need its own app.
I used to use 1Password and really liked it, but the built-in tools have gotten good enough to replace it for me.
I appreciate the comment. Thanks for reading.
LikeLiked by 1 person