
Many activities that once were done with a telephone call and paper documents are now handled on websites or through email. While printing emails and web pages is a fine way to keep track of things, your iPhone and iPad allow you to store these digitally. This has the added benefit of easy search and backup, as well as availability across your devices.
The universal digital format for documents is called PDF, or Portable Document Format. This format has been around for a long time and is the most common way to deal with documents of all types.
While taking a picture of a document or a screenshot of a web page works to create a digital version, those are saved as photos. It is usually preferable to save records as PDFs since these are better suited to documents. They allow text to be copied and searched, and are the expected format when interacting with others. As you’ll see below, creating PDFs is built-in to your devices and is easy to do.
Files
In this post, you’ll use the Files app to save records. There are other ways to save and keep track of records (which I’ll cover in the future), but using Files is easy and is likely similar to what you’re familiar with from using a traditional PC or Mac. The Files app comes with your device, but if it’s not installed, you can get it here.
Create a Records Folder
To start, you will create a folder to hold your records. You can create this folder on your device, or in iCloud, which makes the files available on all your devices.
Start the Files app on your device:

iPhone
On the iPhone there are two options at the bottom of the screen: Recents, which shows files you’ve recently opened or saved, and Browse, which shows all your folders and files.

Tap Browse. If you see a back arrow at the top left of the screen, repeatedly tap that until you are at the main page:


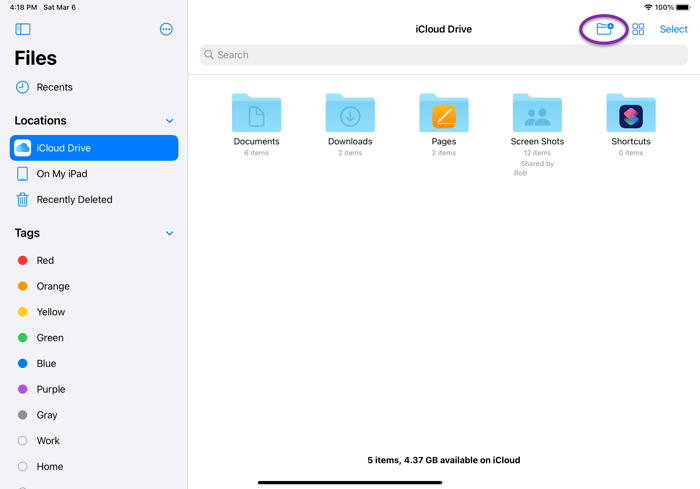
Tap either iCloud Drive or On My iPhone, depending on where you want to store your records. Then, tap the Menu button in the upper-right corner, and tap New Folder:


A new folder will be created called untitled folder, and the name will be selected. Type Records to change the name and tap Done on the keyboard.


iPad
On the iPad the Files app is somewhat different depending on whether you are holding the iPad in portrait (short side at the top) or landscape (long side at the top) orientation.
In portrait orientation, swipe right from the far-left side of the screen to show the sidebar:

In landscape orientation, if you don’t already see the sidebar, tap the Sidebar button in the upper-left corner:

From the sidebar, tap either iCloud Drive or On My iPad, depending on where you want to store your records, then tap the New Folder icon in the upper right of the screen.

A new folder will be created called untitled folder, and the name will be selected. Type Records to change the name and tap Done on the keyboard.


Folders
The Files app allows you to create folders inside other folders. In this post you’re using a single Records folder, but you can follow the steps above to create other folders if you’d like.
Now that you have a place to store your records, let’s look at how to create and save them.
Web Pages
It’s quite common these days to book hotels and flights, make restaurant reservations, and order merchandise from a website. These sites often show you a receipt or confirmation that you may want to save.
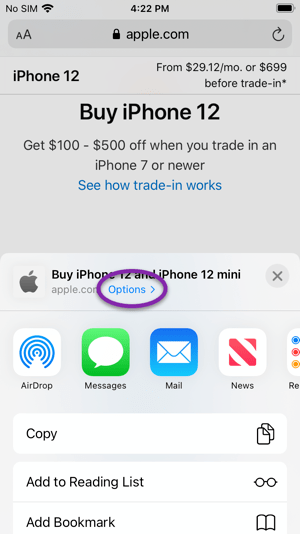
To create and save a PDF version of a web page, tap the Share button. On iPhone, this is in the bottom toolbar, and on iPad, it is in the upper right:

At the top of the Share Sheet, tap Options and choose PDF.

On iPhone tap Done, and on iPad, tap Back:

In the list, choose Save to Files.

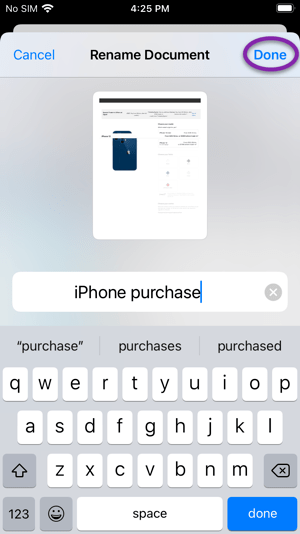
You can give the file a name that will help you more easily find it later by tapping in the file name box and typing the name you’d like to use. Then tap Done.

Now, tap the Records folder you created earlier and tap Save at the top right. Note: You may need to tap iCloud Drive or On My iPhone/iPad first to find the folder.

The Mail app allows you to create folders to store emails that you’d like to save. I use this quite often, and it makes finding those emails simple. However, these folders cannot contain anything other than emails. There are times when it’s useful to save emails and other documents together, for example, keeping everything related to trip planning or a project in one place. Creating a PDF from an email is a good way to accomplish this.
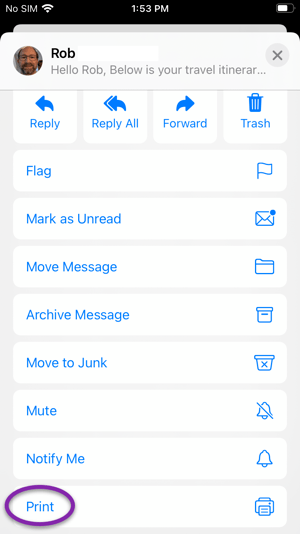
Open the Mail app and tap on the email you’d like to save. Tap the Reply button from the bottom toolbar.

In the list, scroll to the bottom and tap Print:
Now, use two fingers to stretch the image of the email apart. This is the same gesture used to zoom a photo:

From here, tap the Share button at the top right of the screen and choose Save to Files:


Now, just as you did when saving a web page, change the name of the file if you’d like and then select the Records folder. Finally, tap Save.
To return to the email, on iPhone, tap the back arrow in the upper left of the screen, or on iPad, tap Done, and then tap Cancel from the Print page.


Note: this approach works for any app that supports printing. So if you want to save a PDF from an app, and the app doesn’t offer that option, but does support printing, you can use this method.
Save Attachments
To save an attachment from an email to the Files app, just tap and hold on the attachment, then choose Save to Files:
Just as you did above, change the file name if desired and choose a location to save the file, then tap Save.
Viewing Your Records
Once you’ve saved some records, it’s easy to view, print, or even send them to someone else.
To view a file, open the Files app. On iPhone, tap Browse at the bottom of the screen and find the folder containing the file, for example, Records. You may have to tap the back arrow at the top left of the screen to get to the locations list.
Now, tap on a file to view it.


To send the file to someone or to print it while viewing it, tap the Share button, which is at the bottom left on iPhone or at the top right on iPad. Choose how to share the file or tap Print from the list.
When you have finished viewing the file, tap Done in the upper left:
Note: you can also share a file without viewing it. Tap and hold on a file’s icon and then tap Share from the list.
Other Devices
If you save your records to iCloud Drive, they are available on your other devices. On other Apple devices, you’ll find these files in the Files app or, on the Mac, in Finder under iCloud Drive.
Non-Apple
If you use a non-Apple device, you can access your iCloud Drive files from a web browser. Go to www.icloud.com and log in, then click the iCloud Drive icon. From there, you can view the files, download them, upload new files, and more.
If you use Microsoft Windows, you can also use Apple’s iCloud for Windows application, which will automatically sync your files, photos, and more between your PC and Apple devices. You can find more information about that here.
More to Come
There is more you can do with your records, such as marking them up and highlighting text, sharing folders and files with others, and working with other apps. I will cover these (and more) in future posts.
I hope this post helps you to more easily create digital records from the web and email, and also helps you to stay organized.
Use the comments below to let me know if you have questions or would like to see me cover a specific topic in the future.
Cover photo by Jan Antonin Kolar on Unsplash


The On My iPhone doesn’t show up as an option on the Browse screen. I’d like to get PDFs out of the iBooks app. Any ideas? This is great information!
LikeLiked by 3 people
Thank you. Try this: from the Browse screen in the Files app, tap the menu in the upper right (a circle with three dots). Then tap Edit. You might see that “On My iPhone” is turned off. Turn it on and you should be all set. If that isn’t it let me know. I’ll see what else I can come up with.
LikeLiked by 3 people
The On My iPhone is turned on. (just realized I hadn’t responded to this!)
LikeLike